Wednesday 13 November 2013

Spaghetti in basil & tuna pesto - Simple Italian Dinner

 I remember the first time I was initiated to the world of pesto. That first bottle of basil pesto sunk two inches deep in a thick film of olive oil must have attained the most-satisfying moksha as far as basil pesto bottles go. Because I used it on practically anything Italian from salads to grilled fish dishes and everything (read pasta) in between. And I discovered, to my absolute delight, that basil pesto is a delightful accompaniment to the humble, homegrown curd rice.

Not too long after, I stumbled upon fresh basil leaves in the supermarket and tried my first pesto from the scratch. Seriously, once you try and make basil pesto at home (which is not all that difficult, I tell you. Only if you find making chutneys difficult at home that is.), your hands will never hover over the pesto bottles in supermarket shelves deciding on which brand to settle. But again, it depends on the availability of fresh basil in the city you live.

Basil is a hardy herb that loves sunshine. It works as a great indoor plant as well. If you get a sapling, you can have a steady supply of fresh basil leaves in a tropical country like India. Seeds are easy to germinate and once you have a plant, they easily reproduce and sustain your kitchen needs.

This recipe is inspired by an episode of Jamie’s 15-minute meals but heavily adapted to work around the non-availability of ingredients (say for instance canned anchovies that I could just not find anywhere). I substituted 
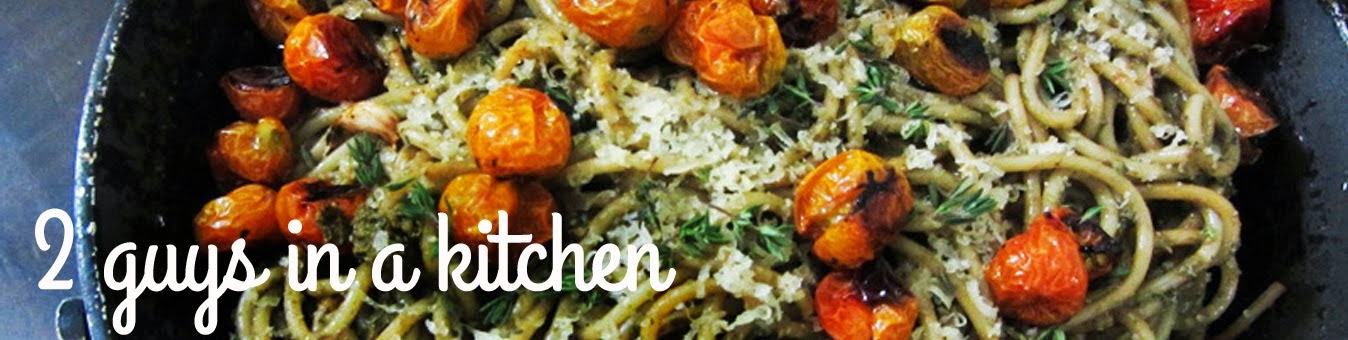
canned tuna flakes in brine. The result was a mildly tuna flavored pasta with the roasted tomatoes and garlic giving it just the required amount of tang and crunchy spiciness. 

Ingredients you need (serves 2):

Spaghetti – 150 gms
Canned tuna in brine – ½ can (100 gms)
Fresh basil leaves – 1 cup
Almonds – 5
Cheese – just enough to garnish
Cherry tomatoes – 15 to 20 or 3 regular ripe tomatoes
Garlic – 4 cloves unpeeled
Olive oil – 2 tbsp
Pepper – as required
Salt – as required

This spaghetti is super simple to make!

How to prepare:

  • Set a pot of water to boil. When it boils, add salt and a teaspoon of cooking oil.
  • Take a heavy bottomed pan, slit each cherry tomatoes or quarter the regular ones. Smash the cloves of garlic with the side of a knife. Mix with the tomatoes some olive oil, salt and pepper and keep it in a preheated oven for roasting for 15 to 20 minutes at 1800 C. 
  • Meanwhile, throw in the basil leaves, almonds and half of the required tuna and some salt in your food processor and grind to a paste.
  • Cook the spaghetti al dente and drain it in a colander. Add the pesto to the spaghetti and toss well.
  • Add the rest of the tuna, salt and pepper to adjust the taste.
  • Add the roasted tomatoes and garlic on top of the spaghetti.
  • Garnish with cheese and serve.
Tip: Let the dish sit for 5 minutes before you serve so the basil loses its raw taste. However, if you are using pesto from a bottle, you can serve it immediately. This pasta tastes great as a leftover too. 

Note: The header you see on the blog is picture in this post.

Friday 1 November 2013

Spinach - Ricotta Pizza

A pizza recipe is in three parts, two of which have been explained in great detail in two previous posts i.e. Pizza Bites and Nidi. With these out of the way, we would like to concentrate on other aspects of pizza making - Toppings, pizza base stretching/shaping, important points about baking the pizza and serving it. Don’t worry; this post also tracks back the previously mentioned recipes for dough making and sauce making for your convenience.

Read on to learn how to make pizza like this. It is not that difficult. Really.
The measurements here are for two medium sized pizzas. Serves about 2 adults.

Part 1 – The Pizza Base (read this recipe for a better idea of dough making here)

For the dough

2 ¼ cups of flour (we used all purpose, if you are using maida = 2 cups of maida + ¼ cup whole wheat flour)
½ to ¾ cups of water to knead the dough
½ teaspoon yeast
Salt
Olive oil
Baking paper (greased)
  • Check the dough making process used for ‘pizza bites’. The same applies for pizza as well.
  •  The trick to get a crisp crust, you need to roll the base out not-so-thin using a rolling pin. Follow this with stretching the base using your hand till you achieve a fairly thin base.
  •  We can write any length of techniques about dough stretching/shaping. But it’s like trying to learn swimming by reading a swimming manual. Practice and practice, at one point you will zero down on the technique that works for you. A separate post on pizza dough stretching coming soon.
  • After stretching the base, lay it on greased baking paper.
Part 2 – The Sauce (read this recipe for making the most simple delicious pizza sauce here)
For the sauce

400gms of ripe tomato
1 blob of butter
10 peppercorns
2 gloves of garlic
Salt to taste
Olive oil

Prepare the sauce according to the recipe and apply it on the base

Apply a thin layer of the sauce on your pizza base

Part 3 – Toppings

A word or two about toppings – a good pizza is not loaded with too many toppings with overlapping flavors. A well developed base and the sauce have flavor and have to stand out. Go for two or three toppings at the most, the cheese being counted as one of the toppings. The cheese also does not have to cover the entire pizza as one sees on the pizza pies of fast food pizza. Unless of course you are making an exclusive cheese pizza (like Quattro formaggi) in which case you have select the cheeses you are going to use. We use cheese very sparingly on pizza and in this one we have used a fresh homemade ricotta. You may use any soft melting cheese you like.
Load your pizza with toppings of your choice.

Here is what we used for toppings.

One bunch of spinach leaves
Cheese (we used homemade ricotta and a less than generous shaving of Parmesan)
Basil leaves
  • Sauté the spinach leaves with oil after washing them thoroughly. Set them aside to cool.
  • Scatter the spinach on the base, sprinkle with cheese.
  • Preheat the oven to 200C with the cookie sheet / pizza stone.
  • Slide the pizza onto the hot cookie sheet / pizza stone and bake your pizza until done (for about 12 - 15 minutes on top rack).
  • Garnish with basil leaves after the pizza is out of the oven and shave Parmesan onto the pizza if you are planning to use. Enjoy your pizza. 

Pizza ready to go into the oven


a big slice


Notes:
If you do not have a pizza stone, bake your pizza on the back of a cookie sheet. Remember, the cookie sheet has to be hot. So either preheat it in the oven or heat it on the stove.

Final word - No, you cannot use ketchup / sauce to eat with your pizza. Trust us - that ruins the entire taste and experience.


Tuesday 22 October 2013

Zucchini / Pumpkin Flower Fritters - Quick Breakfast / Snack

I dream of Italy. A lot. I do. It is my culinary mecca (as it is for three quarters of the world). And when I go there someday – which I hope to – I will eat like it is nobody’s business. I will stuff my face with their glorious gnocchi, ravioli and tagliatelle in millions of sauce variations eating like a pig (and eat pig too), making orgasmic noises. But until then, I will continue to discover little Italian culinary pleasures in my own kitchen like this post.

Although you can find every single Italian dish ever invented in the restaurants, some are still far from reaching the kitchens of India. Zucchini flower fritters is one of them in my opinion. And when I planted zucchini in the backyard it grew wildly and made humongous zucchinis besides also producing numerous flowers. That is when I decided I should try making zucchini flower fritters. The internet is filled with deep fried versions of zucchini flowers but I found one at Parsley Thief that I loved. This is more like a zucchini pancake and you need not necessarily fry them in oil, which means slightly healthier than the deep fried version.
Zucchini Flower Fritters

Ingredients you would need, well almost.

Chop the zucchini flowers, shallots and garlic

Saute the zucchini flowers

Make the fritter batter

Pan fry the fritters
You will need:

Zucchini flowers - take 10 – 15 for 6 pancakes
Flour - 1 cup
Basil leaves - handful
Egg - 1 (you can totally skip it if you are not an egg person)
Yogurt - 1 cup
Garlic - 2 pods
Shallots - 4
Cheese - a tiny block (of cheese in stock, I used cheddar. Also I tried once with tofu and it tasted well too)
Baking soda - a pinch
Oil - as required
Salt - as required

Preparation:
  • Wash the zucchini flowers thoroughly under running water. Remove the green sepals from the flowers and chop them finely after checking for any bugs.
  • Chop the shallots and garlic.
  • Heat oil and sauté shallots and garlic for a minute. Drop the zucchini flowers and sauté them for another minute. Turn the flame down and leave it to cool.
  • Grate the cheese.
  • Break the egg into a bowl, add chopped basil, grated cheese, yogurt, flour, salt and then the cooled down zucchini flower mixture.
  • Whisk well and check for consistency and to avoid lumps. If needed, add water / yogurt / milk to adjust.
  • Add baking soda as the final step.
  •  Heat the griddle and pour the fritters, cook in low flame on both sides.
  • Transfer it into a paper towel so the towel absorb oil from the fritter.
  • Serve hot (it can be eaten plain or with Tabasco).
Note: I tried making the fritters with whole wheat flour and found that it turns out dense. I also tried without adding soda but the effect was just not the same.


Wednesday 3 July 2013

Breakfast cookies... I mean cake.. I mean scones?

Not a planned post, so I want to excuse myself for two things and get them out of the way. Firstly, for the fugly photo and secondly err... I really don't know what these are. They make a quick breakfast if you are the kind who likes muffin/croissant and coffee breakfasts. Bad planning had it that these would have to be egg-less. Go ahead and add an egg by all means, making sure to adjust other wet ingredients accordingly. So here they are; chocolate and banana cake/cookie/scones.

This is the most non fancy- dunk all in one pot- kind of baking. I have listed the ingredients in the order you will actually add them so just follow through!

You will need:

  1. - A little more than 3/4 cup white flour
  2. - A little less than 1/4 cup cocoa powder  (i.e. total flour + cocoa = 1 cup)
  3. - 1/4-1/3 cup sugar depending on the sweetness of your muesli and the banana.
  4. - 1/2 tsp salt
  5. - 1/2 tsp baking soda
  6. - About 1/3 cup muesli with nuts (if using plain muesli, add some almonds)
  7. - 1/2 tsp ground nutmeg
  8. - 1 ripe banana mashed roughly
  9. - 3 tbsp olive oil or melted butter
  10. - 1/4 cup plain yoghurt (or 1 beaten egg)
  11. - Milk to adjust

In a bowl, mix ingredients 1 to 7 (all dry) and combine well. Prepare your baking surface. Grease your cookie sheet or baking paper with shortening, which is what it is really good for; not for eating really. Sprinkle some flour on the sheet. Crank up your oven to 180 degrees C and return to your mixture.
Now, add the mashed banana, oil and the yoghurt and mix with a spatula. You really don't need a hand mixer for this and actually you should not over mix. Just mix until there are no dry portions in the dough/batter. If there are and the mixture is too dry, add milk by the teaspoon to adjust the consistency.
The consistency you are looking for is between cookie and cake, i.e. too wet to be able to handle like cookie dough and too dry to be able to pour like cake batter.
Once there, use another spoon along with your spatula to scoop out and drop blobs of the mixture on the cookie sheet in rows with space enough for them to spread and rise. Bake for about 15-18 mins till they pass a toothpick test.  Remove from oven and let cool while the coffee gets ready.
Good morning :)


Sunday 30 June 2013

Thai curry


It all started with a simple purchase I made at the neighborhood supermarket. My grocery / vegetable shopping is impulsive and I never fail to pick up anything interesting that meets my eye (much to the dismay of the partner). And the Thai kit was one such. It had a (fairly large) piece of galangal, two bird eye chillies, few blades of lemon grass and a few kafir lime leaves. I picked it up and wasted no time in looking up for recipes for Thai Green Curry.

After hours of research that involved reading up recipes ranging from the completely indianized version to the authentic version, I zeroed in on two recipes (which are pretty much similar). The guardian has a lengthy post on How to make perfect Thai green curry that gave me insights like why there is no need to use oil while making the curry. The recipe and the interview with the Thai cooking teacher and author Kasma Loha-unchit also provided useful tips on readily available curry pastes.

Frankly, I am not a fan of curry pastes (neither the other guy) since we are sticklers for freshly ground spices (even the coconut milk I used in this recipe is homemade, so there you go). The flavor of freshly ground spices can never be replaced with store bought pastes that are often overtly spicy, lacking in flavor and extremely pungent owing to their preservative content.

My variations for this recipe:
·         Almost all the recipes I stumbled upon mention eggplant (preferably the round ones) in the ingredient list but all I used in this recipe was zucchini and tofu and my curry turned out fine. In fact, fabulous.
·         Also, I did not use the fish sauce because I did not have any. Instead I crushed some dry shrimp and added in the curry. You can totally skip it if you want a completely vegetarian version.
·         I added peanut milk to give my curry body.

Without much ado, here’s the recipe. I hope your curry turns fabulous too.

Ingredients
For the paste
1” piece of Galangal
2 bird eye chillies (else regular green chillies are ok)
3 blades of lemon grass
2 large kafir lime leaves chopped
2 cloves of garlic
4 shallots
10 white pepper corns
Salt

For the curry
1 cup of coconut milk
1 tsp of palm sugar / palm jaggery
1 medium sized zucchini chopped
50gms silky tofu cubed
1 kafir lime leaf chopped
1 handful of thai basil leaves
1 handful of roasted peanuts
1 tsp of soya sauce
2 tbsp dried shrimp (optional)

Dump all the ingredients for the paste in a mortar and pestle and pound nicely until it becomes a paste. If you are time-pressed, go ahead and use your food processor.
Meanwhile, pour the coconut milk in a hot pan and let it boil for about a minute (or until it starts to split). Throw in your curry paste and let it simmer for some more time. Add the zucchini and tofu and cook until tender.
Grind the peanuts and soya sauce with little water first to a paste and then add about 1/3-1/2 cup more water and blend on high speed like you would a smoothie. Add this peanut milk to the curry, it will thicken. If using, powder the dried shrimp by just pulsing dry in a blender. Add the kafir lime leaves and basil leaves and turn heat off after a minute or so.

Serve hot with fried (or plain) rice. 

Sunday 23 June 2013

Quick and easy lemon cake


One hour flat including the baking if you are a slow coach with obsessive no-spill compulsion like me – that’s how long this fluffy yet crumbly lemon cake will take from measuring flour to cutting the first slice.

A few technicalities about this recipe; there is lemon juice and dairy- so careful not to over-mix else you will end up curdling the milk. Use cold milk to adjust (explained below) to reduce further the risk of it splitting. The small portion of semolina flour has two purposes- it gives the crumbly texture inside the cake and on the outside it gives you a firm, almost crispy crust which eases slicing. Size of the pan is crucial. A smaller pan will mean a taller cake and hence a longer baking time plus excessive doming. The butter- my promise of one hour does not hold if you are taking your butter out of the freezer. It should be at room temperature but firm and not become runny the second you begin whipping it.

Ready for the take off?

Your dry stuff:
1 cup of white flour (maida)
2 tbsp fine semolina (rava/sooji)
¼ tsp salt
½ tsp baking powder
¼ tsp baking soda

Your wet stuff:
¼ cup unsalted butter
3 tbsp olive oil
½ cup sugar (this much is fine for dessert; a little less if it’s for coffee/tea time or breakfast)
1 egg
¼ cup milk to adjust (explained below)
1 lemon- zest and juice.

Other things you need:
7-inch round cake tin
Vegetable shortening for greasing

In a small bowl mix your dry stuff well with a fork. In a larger bowl whisk the butter with a hand mixer till creamy. Add in the sugar and continue whisking until fluffy. If your sugar grains are very large, just pulse the sugar in a blender before adding. Mix in the olive oil and egg and the zest of the lemon.

Add in your dry mixture and mix until combined. It will be very dry so use the milk to “adjust” the consistency. To those people intimidated by baking, trust me; this is what cake baking finally comes down to - knowing the consistency of the batter you want and some sense of proportion. You hear only too often people saying the proportions are oh-so exacting. The measuring is so snootily critical. It is not- all that banter comes from just one difference in the cooking method. Unlike your soup or gravy that you can fine tune as the cooking goes on the stove top, in baking you have one chance to mix your stuff and pop it into the oven. There is no adjusting after that and there is no interrupting the cooking. So when you realize that that is the only reason we are measuring more carefully, you will be less worried about whether you got 5/17th cup of ingredient X measured right.

Back to the batter. So you adjust with the cold milk to get the batter consistency right. Go with my measurement of ¼ cup for the first time and you will figure out the right amount in the subsequent cakes. Now there is the last ingredient lemon juice remaining and we will hold off for now. Turn on your oven to 180 degrees C. Grease your cake dish with the vegetable shortening. It is the best thing for greasing- tastes horrible and bad for health if consumed in excess but perfect for greasing. I usually have a stick of the stuff in the fridge frozen and use it like a crayon to grease the baking dish.

Add the juice of lemon and whisk until just combined (but well distributed in the batter) as less as possible. Quickly scrape out the batter into the prepared dish and pop into the oven (I never wait until fully pre-heated). After adding the lemon juice you need to work quickly because the acid in the lemon and the baking soda react very fast. You do not want to lose all that fizz which will make your cake fluffy.
Bake for 25-30 mins until the cake passes a toothpick test. Cool a bit but serve warm :)


Wednesday 29 May 2013

Whole Wheat bread


Key to making whole wheat bread is to first get to know the high hydration requirements of whole wheat flour and secondly giving up the attraction for fancy shapes that white bread can be made into. When it comes to whole wheat bread, taste, texture and most importantly health are the highlights. If you want a golden glossy 5 strand braided wreath bread, please stick to white bread (it will look pretty on one's coffin as they say "the whiter your bread, the sooner you're dead!"). There is not much shaping possible with this bread.
This is the second post for whole wheat bread. This one is different in that it is a little lighter as there are no potatoes and I also found this was closer to the store bought wheat bread as regards the crumb and the ease of slicing.
For a small little loaf that can be polished off by two people at breakfast you will need:
- 1 1/2 cups of whole wheat flour
- 5/6 cup of water *
- 1/6 cup of olive oil * (any liquid fat is fine, be healthy and choose a good kind)
- 3/4 tsp dry yeast
- 1/2 tsp sugar
- Salt
- Spices/nuts/seeds ** (optional add-ons)
- 1 Tbsp White flour i.e. maida - for handling the sticky dough. Lesser you use the better, although no more than 1 Tbsp.

(*The weird water to oil proportions are because I had to write in some numbers. The basis is 1 1/2 cup flour to 1 cup fluid (oil+water). Easy measuring is explained below)

Getting started. Warm roughly 1/4 - 1/3 cup of water. You should be able to hold your finger in the water comfortably (60 degrees C precisely). Add the warm water to the yeast and sugar, stir and keep side while you measure out the whole wheat flour in a large bowl. Add the salt and add-ons if using.

** Digression: Whole wheat flour uses the whole wheat berry i.e. the bran and the germ that contains oil is also ground into the flour. This oil is what gives the bread a more full nutty taste when fresh but is also responsible for the slightly bitter taste associated with whole wheat bread. The oil in the germ turns rancid due to contact with water. The bitter taste is very mild and does not at all mean that the bread is going bad. It can be felt only when eating the bread plain without toasting and if you are very discerning of such mild changes in taste. However, bitterness is bitterness and most whole wheat bread recipes contain some additives to mask it (I know of a recipe that uses orange juice!). Choose wisely at most one or two additives from each of these two groups.
Spices: (dry) oregano, thyme, rosemary, black pepper, crushed garlic.
Nuts/seeds: Sunflower kernels, watermelon seeds, pumpkin seeds, sesame, walnuts. I used caraway (ajwain) + sesame in this one.

Back to the bread; your yeast should be frothy and bubbly by now. Pour it into your cup measure and add more water well above ¾ of the cup but not full. Then top up the cup to the brim with olive oil. This will get you close to the 5/6 water to 1/6 oil ratio. Pour the brimming cup of fluid into the dry ingredients and mix until all wet. Knead with the dough hook attachments on your and mixer for about 7-10 minutes. I don’t recommend hand kneading; it gets very sticky and you will waste a lot trying to clean your hands and hand kneading requires a good 20-25mins of kneading.
If you have made white bread before don’t expect the same smooth, springy dough. It is going to be a shaggy dough and definitely avoid attempting a paning test; it won’t pass. Scrape the sides of the bowl and the dough hooks to gather the dough to the center and keep covered to rise. There is no additional kneading on the counter top to make a ball, it can rise as such in the bowl.

In an hour or two your dough should have risen to double its volume. Grease your loafpan and keep ready. I find vegetable shortening (vanaspati/dalda) is the best for greasing. It’s horrible to taste and unhealthy to eat but excellent for greasing. It does not get into the bread. You can find it remaining in the pan once the loaf is out. Using a rubber spatula deflate the dough and gather it to the middle of the bowl. Heavily flour your counter top/kneading surface and your hands using some of the 1 Tbsp white flour. Turn out the dough onto your counter top and sprinkle on top some of the white flour. With as few as 6 to 10 light strokes pat it smooth and shape it into a log. Remember; do not work the white flour into the dough. It is supposed to remain at the surface to prevent sticking (to your hands and the counter). Plop the shaped log into your prepared loafpan and give it a shake for the log to settle in snuggly. Let rise another 30-40 minutes and bake at 180 degrees C for 35-40 minutes. Knocking on the bottom of the pan should produce a hollow sound. Remove from pan and slice when cooled completely.


Sunday 19 May 2013

Pizza bites

Nothing fancy. There are recipes all over the internet dime a dozen. This just happens to be a tried and working vegetarian variation. The classic recipe is with pepperoni. Also in this version the tomato sauce goes into the dish and is hence easier to serve. The prep for this dish is exactly the same as for pizza. In fact in the last minute you can just decide to make it a pizza, albeit one with only very unimaginative toppings. So let's get started.
The recipe has two parts- dough and filling. Start with the dough.
Warm about 1/4 cup of fluid (water or milk). You should be able to comfortably keep a finger in the water. "Ouch"- hot is equal to "ouch, you killed the yeast". If this subjectivity is too much for you, get a thermometer, we want 60 degrees C. Add 60 degrees C water to 3/4 tsp dry yeast and 1/2 tsp sugar, stir and keep aside while you measure out flour.
For 12 pizza bites you will need 2 cups of all-purpose flour. If all-purpose flour is synonymous with maida for you (which it is not, ask me), then take 1 3/4 cup of maida and 1/4 cup of atta. Add salt to taste and check the yeast now for bubbly froth. No froth? Pack up- next recipe please. Yeast has to be frothy. Pour the frothy yeast into the flour and an additional 1/4 cup plain water. Measure out 1/4 cup water and keep aside before starting to knead. Use the dough hooks attachment on your hand mixer. You will need more water as you knead. Use the measured out 1/4 cup of water, but that is the max you can go with water i.e. 2 cups of flour to 3/4 cup of water in total (1/4 cup with yeast, 1/4 to start kneading and 1/4 as you go on). It is precisely 2 cups of flour to 2/3 cup of water. Since atta soaks a lot we allow 3/4 cup water , but really no more. Knead 5-7 mins with the hand mixer or 15-20 mins after the dough comes together if kneading by hand. Nice smooth and springy ball, coat with a dot of oil to avoid drying and then pizza dough - R.I.P (rise in peace).
Summing up pizza dough ingredients and proportions:
- 2 cups flour (see above about what kind)
- 2/3 cup water in ALL (3/4 if using whole wheat, see above)
- 3/4 tsp dry yeast
- 1/2 tsp sugar
- salt

For the filling you will need:
- 6-7 ripe tomatoes
- A knob of butter (1tsp)
- 10 leaves of of fresh basil or dry oregano/thyme
- Black pepper corns
- 3-4 cloves garlic
- Handful of sweet corn kernels (frozen is fine)
- 75 gms of your favourite cheese (cheddar or mozarella works fine).
- 2 Tbsp Extra virgin olive oil
- salt

Quarter tomatoes and throw them in the jar of a blender. Pulse for 3-5 seconds. We don't want them pureed; just thoroughly crushed small chunks are good. Set on a stove a saucepan or any heavy bottomed vessel with the knob of butter on high flame. Add all the tomato mush and bring to a boil. Then reduce the flame to simmer; cover and forget about it for at least 20 mins.
Meanwhile, crush pepper corns, peel and mince garlic, thaw the corn kernels and cut the cheese into 12 equal cubes/pieces.
Back to the tomatoes. Scrape the sides of the pot and bring the pulp together in the middle. There should be very little water separating out of the tomato pulp, else cook open on a high flame. Add the crushed pepper, salt and minced garlic and stir well on high flame. You should have crossed pizza sauce consistency reached almost a loose tomato paste consistency. Turn off the heat and mix in the corn kernels immediately. After about 2 mins stir in olive oil and shreds of basil.

Assembly. Deflate with flour dusted hands the now risen pizza dough and make a ball with as little handling as possible. Depending on your work surface, roll out the dough as thick as you would for pizza (or a little thicker if you only make thin crust).

 Cut them up into about 3 inch pieces (squares/rectangles) with a knife.

On each piece of rolled out dough place some filling and a piece of the cheese (no grating..yipee!).

Wrap up each piece bringing up the sides and sealing in the filling. Place seam side down on a greased baking dish.

If you do not want them pull-apart style use a large cookie sheet and place them well spaced (totally unnecessary in my opinion). Let rise for another 20-30 mins and bake in an oven pre-heated to 180 degrees C for about 30-40 mins or till the bread looks done. Optionally brush on top with butter and dry spices when still hot. Pull apart (or not) and enjoy.


Wednesday 8 May 2013

Blog resurrected with prawn curry

I claim and assert my malayalee roots to excuse myself from explicitly calling the dish Kerala prawn curry. Well it is and most curry posts,especially seafood, unless otherwise qualified will be.
This is a super quick dinner fix; one of those meals about which you can hear non vegetarian Keralites saying.. "I make non-veg meals so that I don"t have too many veggies to chop and too many side dishes to make and just this one curry completes the meal".
A note before we begin, this is not a curry to make if you have umami craving. The prawns are really only meant to flavor the curry and not for biting into. Hence the really small quantity of prawns required. We now begin.
You will need
- 6-8 medium sized prawns (cleaned)
- 1 raw mango from the mango tree outside peeled and chopped.
- 10 curry leaves
- 2 green chillies
- 1/4 coconut
- Red chilli powder
- Turmeric powder
- Corriander powder
- Cumin seeds
- 2 cloves of garlic
- 1 small piece of ginger
- 3 dry red chillies
- 3 shallots/1/4 onion finely chopped
- Mustard seeds
- Fenugreek seeds
- 2-3 Tbsp Coconut oil
- Salt

Ok, that seemed like a long list, but you must admit it's mostly just regular stuff found in any Indian kitchen even when your grocery shopping is due. Set on the stove a pot with 2 cups of water with prawns, mango, curry leaves, slit green chillies, turmeric and salt. When it comes to a boil reduce to a simmer and carry on with the remaining prep. Into the jar of a blender make a paste of chopped coconut (don't bother with grating), red chilli powder, corriander powder, cumin seeds, garlic and ginger. Add water as needed. The prawns must be simmering for about 15-20 mins by now. Add the contents of the blender and bring to a boil. Simmer again for 5 mins for the raw spices to cook through and take off heat. Temper the curry - heat coconut oil in a wok, splutter mustard seeds, add fenugrek seeds, dry red chillies and shallots/onions- pour the hot oil with condiments into the curry and mix. Ladle some curry into the wok to get all the oil. Serve with rice or rice based main dish like idli, dosa, idiappam or appam.
Nothing fancy hence no photo.

Monday 18 February 2013

Spaghetti with Mackerel

Happy New year and all that! For the elusive reader, here's a sincere apology for not posting for a long time. To be fair to us, it's the terrace gardening that kept us from posting new recipes. So one of these days, when we saw Jamie Oliver's 'Fish with linguine' recipe on his FB wall, we knew this should be tried and tested. Tried and tested we did and owing to its awesomeness, we immediately decided it needs to be shared. 

Here it is for you. We have generously adapted the recipe to fit our taste (and to the ingredients that we had in the kitchen). Not a fish eater? Just skip the mackerel and you get a great, light pasta dish for dinner!


Mackerel - 2 fillets 
Spaghetti (or linguine) - 250 gms
Garlic - 3 large or 4 small cloves
Cherry Tomatoes - 4 to 5 (or one big tomato)
Parsley - few sprigs
Thyme - few sprigs
Lemon -  1 (juice and zest)
Fresh Red Chili - 1
Butter - 1 tbsp
Olive Oil
Sea salt
Pepper 

Directions to cook:


  • Set a pot of water to boil for the pasta with a teaspoon of cooking oil and salt. Meanwhile...
  • Wash the fillet, apply just enough salt and crushed pepper and keep aside to marinate.
  • Peel and slice the garlic cloves, finely chop the red chili, parsley and thyme; also, halve the cherry tomatoes and zest the lemon
  • Add around 3 tablespoons of oil in the hot wok, add the garlic; once it starts to show some color, add red chili, half of parsley and the fish fillet (skin side down, else your fish will curl up in the heat)
  • Toss and cook the fillet in low heat; it's ok if it flakes and breaks, it's supposed to (if it doesn't, use the spatula to break it up into rough chunks. You don't want a whole fillet in your pasta)
  • Add the tomatoes and stir for about a minute
  • Throw in the lemon zest and stir for exactly 30 seconds, else the zest loses its flavor
  • Turn off the heat and add the lemon juice and give it a stir
  • Your pasta must be done now, use tongs to add the pasta from the pot to the wok. 
  • Add the butter to the hot pasta and toss to coat
  • Add the seasoning, salt followed by the finely chopped spices - Parsley and Thyme
Serve warm!